Yamaha Drive (G29) Basic LED Light Kit- Instamatic®

Yamaha Drive G29 (2007-2016) Headlight and Taillight Kit
_____________________________________________________
Kit Includes:
- Two LED headlights with Amber Marker Lights and two LED Tail Lights
- One Wiring Harness with Push/Pull Switch
- Directions, Hardware and Light Templates
- Compatible with Gas or Electric Carts
- This FlexVolt™ light kit is designed to operate on 12-48 Volts, NO voltage reducer required. Save time and money!
Description:
This basic light kit will allow you to quickly and easily bring a new dimension to your Yamaha Drive golf cart. This is the perfect kit for those who are not looking to make their cart street legal but simply need bright lighting to make their cart safer and more enjoyable by illuminating the way ahead. Simply connect the supplied wiring harness to your battery or batteries (electric models) and then plug in the headlights and tail lights and you will be ready to go. The provided instructions and light templates will make installation a breeze and get you out enjoying your cart in no time!
Who is this kit for?
Designed for our customers who want simple and reliable lighting but don't need signaling capability. Primarily for customers who drive their golf carts in these locations:
- Campgrounds
- Farms
- Walking paths and trails
- Neighborhoods *when not using for street use
Looking for a street-legal upgrade? Check out our Yamaha Drive (G29) Street-Legal Light Kit
Tech Specs:
- Gas and electric cart compatible
- Operating voltage: 12 volt minimum | 48 volt maximum (no voltage reducer required)
- Operating amperage draw: 1-2 amps
- Wire loom with the following connection ports:
- Driver and passenger headlights
- Driver and passenger taillights
- Battery(ies): Ring terminal connections
- Push/pull switch for light on/off
Yamaha Drive (G29) Light Kit Installation Overview (Basic Kit):
When we designed our Yamaha Drive basic light kit, we designed it to be user friendly and quickly installed. When you go to install our light kit, there are a few steps you will need to complete.
- First, please be aware that if you are not replacing old headlights and taillights, you will be required to cut into your golf cart's body cowl to place and install the lights. We understand this may sound daunting but rest assured we provide accurate templates to make this process as simple and easy as possible.
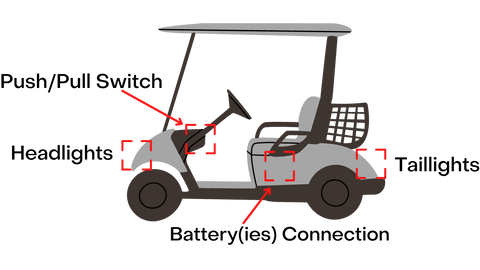
- In addition to cutting out the light templates, you will also need to run the wire loom through the body of your golf cart to the necessary connection points. These connection points are for the headlights, taillights, battery connection, and the push/pull switch. Please refer to the diagram below for an overview of these connection locations.

- Lastly, you will also need to cut a small hole in your dash panel to install the push/pull switch

Experience what powerful lighting can do
Customer Photos


